I originally planned to sew a new set of stays using the brand new American Duchess pattern, but then I decided to start a diet, and so I'm going to hold off on any fitted undergarments until my measurements are a little more consistent. However, there are plenty of non-fitted undergarments to sew, and I managed to have quite a lot of fun this month!
My big project was a new false rump. Some of you may remember that I sewed one a little over two years ago, but that there were clearly some problems with it. It was 100% polyester first of all, between the synthetic fabric and the polyfil stuffing, but I was also never fully satisfied with how it looked. I referenced a number of 18th century bums, looked at patterns that others had shared, and still didn't like how it looked on me. I think part of the problem was definitely in the materials, since polyester just acts a little bit differently than natural fibers, but I think the biggest problem was my expectations warring with reality. The rump I sewed in early 2016 was crescent shaped, and although it was based off of a number of extant examples, the overall look I wanted from the entire outfit probably would have been better achieved with a split, more pillowed, rump.
 |
| Every good project starts with some research and planning! |
So, after receiving the American Duchess Guide to 18th Century Dressmaking for Christmas (thanks Mom and Dad!!!), I decided that I would make a new false rump, this time following the pattern in the book. I've had some fabric set aside for an Italian gown for a while now, so I figured that I might as well drape it over a false rump! Because Lauren and Abby did such a good job, the instructions and pattern in the book are super easy to follow. I cut out the two pillows and sewed up their sides, and then cut and hemmed the panel of fabric.
 |
| I often just use pins instead of marking chalk/pencil/etc. I find that they're easier to alter, and I would have to pin anyway to prevent the fabric from slipping when I cut, so I might as well just save myself some time |
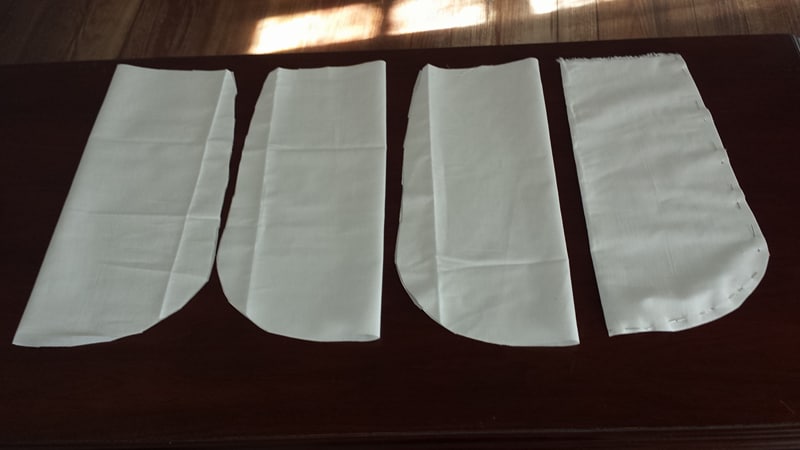 |
| Each side cut out and ready to go |
 |
| The pillows sewn together |
By this point in my life, I've spent a lot of time looking at extant false rumps, and there are some that have an extra panel of fabric down the back, like half of a petticoat, and there are some that are only the pillow itself. I wasn't able to find an answer to why that extra fabric was sometimes there and sometimes not through all of my research, so I paid a visit to the Milliner's Shop to pick their brains, and they had the same answer I did: We're not sure! However, they had some of the same hypotheses that I did, and so we talked them over a little. Maybe the extra fabric helps to keep the rump in place (my polyester one certainly slid around, but I had blamed that mostly on the fabric). Maybe it kept the false rump from going up too high when you sit down. Or, maybe it keeps potentially sharp feathers from poking you! I would love to be able to fully research this, probably starting with analyzing the stuffing of extant rumps and making a chart to see if there's any correlation between which ones have extra fabric and which ones don't. However, I have a number of other projects that I have to get to before that, and some of those are long-reaching research projects for work, so it might be awhile...
 |
| The skirt on its own... |
 |
| ...and with the pillows sewn on! |
Anyway, once I had the rump sewn together, it was time to add the stuffing! I really wanted to use cork, because I thought that would be super cool, but I don't drink nearly enough wine for that to be feasible. I don't have easy access to feathers, but all I had to do was wander across the street and ask for some wool! The Weavers were incredible kind, and gave me two pounds of washed wool, which I then got to card! However, I didn't have wool cards, and as cool as it would be to own some, I didn't want to spend over $100 on them at this point in my life. Luckily, wire animal brushes are a really good substitute, and they only cost me $4 at Wal-Mart. :)
 |
| One of the many Leicester Longwool sheep at Colonial Williamsburg, and a good source of wool! |
 |
| Dog brushes with some un-cared wool |
 |
| It's a good day at work when you get to sew a false rump! |
 |
| (And don't worry, I wasn't using the modern brushes in front of guests. We were having a slow morning, so I was able to do some of the carding then) |
 |
| Carded wool for the stuffing! |
I enjoyed carding the wool, stuffed the pillows with it, and immediately tried it on. So, I now pose the eternal question to all of you:
Does this make my butt look big?
 |
| (I hope so!) |
The Challenge: Under
Material: Cotton fabric, wool stuffing
Pattern: from the American Duchess Guide to 18th Century Dressmaking!
Year: 1770's-1790's
Notions: Linen thread, twill tape
How historically accurate is it? 100%, or as close as anything made in 2018 can be to 100% accurate. It's entirely handsewn with all natural fibers. I carded the wool myself, and I know the sheep it came from!
Hours to complete: About 4 hours to sew everything, and probably around another 4 hours to card all of the wool.
First worn: Not yet, just to try on, but hopefully with a new Italian gown in the near future!
Total cost: ~$5, I already had most of the materials or was able to get them for free/cheap.
Even though the false rump was the main attraction for this month's challenge, I also sewed another new pair of garters. During the first half of February, I went through training to become a nationally certified interpreter (yay!), and part of the certification required a small interpretive program that we each presented to be graded on. For my interpretation, I decided to talk about self-expression in 18th century fashion, since that's pretty much my favorite topic. I mentioned a lot of different ways one could express personal views in the late 18th century, but it should come as no shock that garters received the most attention. I brought in some earlier pairs of garters that I had made, but decided that I also wanted to make a pair that would help connect the subject matter to a modern audience. In the 21st century many people wear t-shirts or hats that come right out and say what they support, be it a political idea, religious affiliation, or love for a sports team. Since I see so many people wearing garments supporting various teams every day, and because I really like hockey, I decided to embroider a pair of garters that mixed 18th century fashion with 21st century expression. I present...
Game Day Garters!

I've had this idea for a while now, so it was fun to finally execute it. The St. Louis Blues are one of my favorite hockey teams, and since my garters are always covered by my petticoats, this will be a great way to cheer them on, even when I have to work during some of their games. If this wasn't such a niche market I would start a company making Game Day Garters, but if you're interested in a customized pair, just let me know!
I made a pair for the Toronto Maple Leafs while watching their Next Century Game in January, although I will probably make another pair in the future that I don't freehand entirely while I'm distracted so that they can be a bit neater and better planned out. On both sets of garters I've included the phrase that the club has been using recently; the Blues have been using #AllTogetherNow as one of their tags on social media this season, and the Leafs had the featured phrase over a doorway, and somewhere there is a spectacular photo of it, although I have been having trouble relocating the image...
 |
| Why it's important to draft before embroidering... this could have been wayyy more centered, and a lot better proportioned |
 |
| I still really love the words though, and I am looking forward to making my next set of Leafs Garters! |
My parents came to visit me for my birthday/my mom's birthday, and they stayed in an 18th century house! This was a fantastic photo opportunity, so we got a few neat shots of me tying my garters, reminiscent of some 18th century paintings and images.


Stay tuned for more historical sewing projects! Coming up, there's the challenge for March, which focuses on comfort around the home, and I'm pretty excited about what I'll be making. I also received a commission with some super awesome fabric, and so I'll be posting that with permission at some point as well. If anyone has any suggestions for what I should sew in the upcoming months, just let me know, because there are still a few months that I have absolutely no clue what I'll be doing! And, if you want to follow along with the Historical Sew Monthly, or join in and do some of the challenges yourself, you can find all of the information on that here.


