Showing posts with label Underclothes. Show all posts

Thursday, March 1, 2018

February: Under

For the Historical Sew Monthly, the February challenge was Under: Make something that goes under the other layers.

I originally planned to sew a new set of stays using the brand new American Duchess pattern, but then I decided to start a diet, and so I'm going to hold off on any fitted undergarments until my measurements are a little more consistent. However, there are plenty of non-fitted undergarments to sew, and I managed to have quite a lot of fun this month!

My big project was a new false rump. Some of you may remember that I sewed one a little over two years ago, but that there were clearly some problems with it. It was 100% polyester first of all, between the synthetic fabric and the polyfil stuffing, but I was also never fully satisfied with how it looked. I referenced a number of 18th century bums, looked at patterns that others had shared, and still didn't like how it looked on me. I think part of the problem was definitely in the materials, since polyester just acts a little bit differently than natural fibers, but I think the biggest problem was my expectations warring with reality. The rump I sewed in early 2016 was crescent shaped, and although it was based off of a number of extant examples, the overall look I wanted from the entire outfit probably would have been better achieved with a split, more pillowed, rump.

Every good project starts with some research and planning!

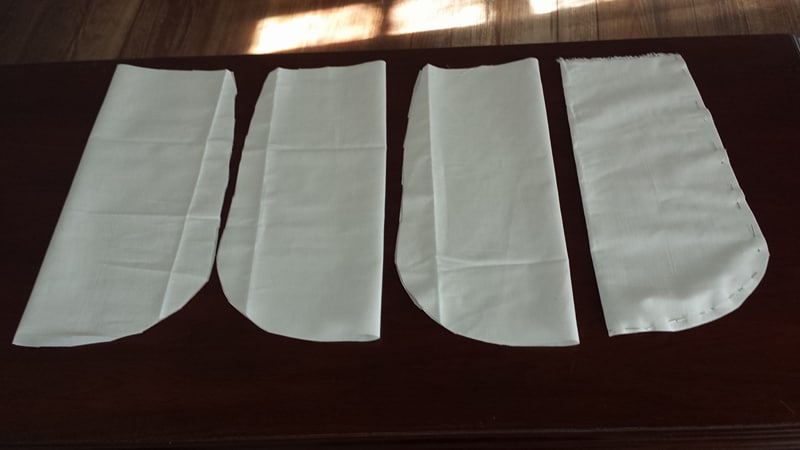
So, after receiving the American Duchess Guide to 18th Century Dressmaking for Christmas (thanks Mom and Dad!!!), I decided that I would make a new false rump, this time following the pattern in the book. I've had some fabric set aside for an Italian gown for a while now, so I figured that I might as well drape it over a false rump! Because Lauren and Abby did such a good job, the instructions and pattern in the book are super easy to follow. I cut out the two pillows and sewed up their sides, and then cut and hemmed the panel of fabric.

I often just use pins instead of marking chalk/pencil/etc. I find that they're easier to alter, and I would have to pin anyway to prevent the fabric from slipping when I cut, so I might as well just save myself some time

Each side cut out and ready to go

The pillows sewn together

By this point in my life, I've spent a lot of time looking at extant false rumps, and there are some that have an extra panel of fabric down the back, like half of a petticoat, and there are some that are only the pillow itself. I wasn't able to find an answer to why that extra fabric was sometimes there and sometimes not through all of my research, so I paid a visit to the Milliner's Shop to pick their brains, and they had the same answer I did: We're not sure! However, they had some of the same hypotheses that I did, and so we talked them over a little. Maybe the extra fabric helps to keep the rump in place (my polyester one certainly slid around, but I had blamed that mostly on the fabric). Maybe it kept the false rump from going up too high when you sit down. Or, maybe it keeps potentially sharp feathers from poking you! I would love to be able to fully research this, probably starting with analyzing the stuffing of extant rumps and making a chart to see if there's any correlation between which ones have extra fabric and which ones don't. However, I have a number of other projects that I have to get to before that, and some of those are long-reaching research projects for work, so it might be awhile...

The skirt on its own...

...and with the pillows sewn on!

Anyway, once I had the rump sewn together, it was time to add the stuffing! I really wanted to use cork, because I thought that would be super cool, but I don't drink nearly enough wine for that to be feasible. I don't have easy access to feathers, but all I had to do was wander across the street and ask for some wool! The Weavers were incredible kind, and gave me two pounds of washed wool, which I then got to card! However, I didn't have wool cards, and as cool as it would be to own some, I didn't want to spend over $100 on them at this point in my life. Luckily, wire animal brushes are a really good substitute, and they only cost me $4 at Wal-Mart. :)

One of the many Leicester Longwool sheep at Colonial Williamsburg, and a good source of wool!

Dog brushes with some un-cared wool


It's a good day at work when you get to sew a false rump!
(And don't worry, I wasn't using the modern brushes in front of guests. We were having a slow morning, so I was able to do some of the carding then)

Carded wool for the stuffing!


I enjoyed carding the wool, stuffed the pillows with it, and immediately tried it on. So, I now pose the eternal question to all of you:

Does this make my butt look big?


(I hope so!)


The Challenge: Under
Material: Cotton fabric, wool stuffing
Pattern: from the American Duchess Guide to 18th Century Dressmaking!
Year: 1770's-1790's
Notions: Linen thread, twill tape
How historically accurate is it? 100%, or as close as anything made in 2018 can be to 100% accurate. It's entirely handsewn with all natural fibers. I carded the wool myself, and I know the sheep it came from!
Hours to complete: About 4 hours to sew everything, and probably around another 4 hours to card all of the wool.
First worn: Not yet, just to try on, but hopefully with a new Italian gown in the near future!
Total cost: ~$5, I already had most of the materials or was able to get them for free/cheap.


Even though the false rump was the main attraction for this month's challenge, I also sewed another new pair of garters. During the first half of February, I went through training to become a nationally certified interpreter (yay!), and part of the certification required a small interpretive program that we each presented to be graded on. For my interpretation, I decided to talk about self-expression in 18th century fashion, since that's pretty much my favorite topic. I mentioned a lot of different ways one could express personal views in the late 18th century, but it should come as no shock that garters received the most attention. I brought in some earlier pairs of garters that I had made, but decided that I also wanted to make a pair that would help connect the subject matter to a modern audience. In the 21st century many people wear t-shirts or hats that come right out and say what they support, be it a political idea, religious affiliation, or love for a sports team. Since I see so many people wearing garments supporting various teams every day, and because I really like hockey, I decided to embroider a pair of garters that mixed 18th century fashion with 21st century expression. I present...

Game Day Garters!


I've had this idea for a while now, so it was fun to finally execute it. The St. Louis Blues are one of my favorite hockey teams, and since my garters are always covered by my petticoats, this will be a great way to cheer them on, even when I have to work during some of their games. If this wasn't such a niche market I would start a company making Game Day Garters, but if you're interested in a customized pair, just let me know!

I made a pair for the Toronto Maple Leafs while watching their Next Century Game in January, although I will probably make another pair in the future that I don't freehand entirely while I'm distracted so that they can be a bit neater and better planned out. On both sets of garters I've included the phrase that the club has been using recently; the Blues have been using #AllTogetherNow as one of their tags on social media this season, and the Leafs had the featured phrase over a doorway, and somewhere there is a spectacular photo of it, although I have been having trouble relocating the image...

Why it's important to draft before embroidering... this could have been wayyy more centered, and a lot better proportioned

I still really love the words though, and I am looking forward to making my next set of Leafs Garters!


 Bonus Photos!
My parents came to visit me for my birthday/my mom's birthday, and they stayed in an 18th century house! This was a fantastic photo opportunity, so we got a few neat shots of me tying my garters, reminiscent of some 18th century paintings and images.


Stay tuned for more historical sewing projects! Coming up, there's the challenge for March, which focuses on comfort around the home, and I'm pretty excited about what I'll be making. I also received a commission with some super awesome fabric, and so I'll be posting that with permission at some point as well. If anyone has any suggestions for what I should sew in the upcoming months, just let me know, because there are still a few months that I have absolutely no clue what I'll be doing! And, if you want to follow along with the Historical Sew Monthly, or join in and do some of the challenges yourself, you can find all of the information on that here.


Wednesday, August 16, 2017

Day 16: Small Project

            If you’ve clicked back through my blog, or been following me for a little while, you have probably seen my post on garters. In essence, garters are a great part of 18th century material culture, because they could show off a lot of personality, as well as carrying important messages. Since I do most of my 18th century sewing at work, I like to work on projects that show a side of historical people most visitors wouldn’t have considered otherwise, and garters are a great way to do that.


            This month, I’ve taken a saying from an extant pair of garters, halte la, on ne passe pas (stop here, do not go further), and mixed it with a design found on other sets of garters from the period.


            It’s a nice way to work on my embroidery skills while also sharing a small peek into the personalities of the past. In 200 years, historians might find a Grumpy Cat t-shirt and wonder if its owner was particularly anti-social, or simply had a sense of humor. This is the same question we get to ask today when we look at garters like these, and it’s exciting for me to be able to connect the past to the present in such a vivid way.


I don't have a lot of information about these individual garters. I know they were used in a museum exhibition showing underclothes and accessories from 1812, but I also know that this style was seen as early as the 1770's. Furthermore, one of my colleagues who speaks French much better than I do pointed out that "la" should have an accent to indicate its use as a place and not an article. I don't know if this was optional in 18th century French, or if these were perhaps made/decorated by a young lady who was just learning French. After all, you can buy lots of shirts that say "amour" and "bonjour" on them today, why wouldn't French, the language of diplomacy, be just as popular for ornamentation in the 18th century?

Sunday, August 6, 2017

Day 6: Book Recommendation

            I have a lot of costuming books, and especially historical costuming books. So, choosing a favorite is pretty difficult. However, Fitting and Properstands out to me, being one of my first costuming books, as well as the first book I drafted a pattern from.


            My parents got it for me as a reward for finishing an extra online class ahead of schedule, as well as buying me my first pair of 18th century shoes. I’ve sewn a gown, mitts, shortgown, and a calash so far from the patterns in the book, and it couldn’t have been easier to follow!
            In a similar vein to The Cut of Women’s Clothes, the book places traced patterns on a grid, so they’re easy to reproduce exactly as they exist in real life, but they can also be sized up or down to fit each individual. The book also provides the thread count for the materials, instructions for the construction, photos of the original garments, and a written history of both the generic idea of the type of garment as well as the extant piece itself.


            I highly recommend this book, especially for those costumers who are just entering the historical costuming world, or anyone who is learning how to draft patterns. And, even if you don’t make anything from it, it’s still a wonderful book to flip through and learn from!

Thursday, August 3, 2017

Day 3: Extant Garment

            One of the most common mistakes made in the costuming world is neglecting your undergarments. The proper foundation makes any outfit look even better, and in a century like the 18th century, where structural undergarments were such a key part of every ladies’ wardrobe, it’s important to build your ensemble from the skin up. Before I had ever sewn a dress that required side hoops, I made a pair of hoops, also known as panniers, to wear while draping my future gowns.
            The hoops I constructed were made with the help of the Dreamstress’ “Panier Along”, and very much inspired by a pair of hoops currently in the collection of the Victoria and Albert Museum. When I visited the museum this past March to see their exhibit Undressed: A Brief History of Underwear, I was thrilled to find the hoops featured at the beginning of the display.

            It shouldn’t come as a shock to anyone, but costumers and historians can both be a little crazy, and I have my feet solidly in both camps. So, one of the most special parts about my trip to England was getting to see a garment that I had studied through a computer screen, recreated with my own two hands, and worn in the heat of a Williamsburg summer, staring right back at me in real life. I had done everything that I could to learn about panniers and understand them, and after I felt that I had finally gotten almost all of the knowledge I needed from that particular subset of history, I was fortunate enough to see the piece that started it all. I know, I know, that’s really nerdy, but it was a really exciting moment for me.


Thursday, April 6, 2017

The Garter Project

Garters are a necessary part of any 18th century wardrobe, because they keep your stockings from falling down. Usually, a tape tie (typically linen, wool, or cotton) will suffice, but I wanted something a little bit prettier and more fun. As always, I began researching, and started looking for examples of 18th century garters.

"Nothing can be equal"

"Dishonored be he who thinks ill of it" - Order of the Garter


Very soon, I discovered that words on clothing was not unique to the modern era! There are hundreds of examples of garters with text on them, ranging from expressions of friendship, to love, to political sayings, and even somewhat sassy phrases. Since I love anything that shows the personalities of people living in the 18th century, I was very eager to begin making some new garters, as well as interpreting them at work.

"More sincere than I am/You will not have friends"?


I decided to begin with a saying that I had found at the beginning of my research, but had lost the documentation for: "Gentleman, thy hand goes no further". I haven't really done much embroidery before, so this was going to be my opportunity to develop some skills. Luckily, I had some cream-colored silk left over from my Fourth of July market bonnet trim, so I cut that into two rectangles, about five inches long and about four inches tall. In retrospect, I wish I would have made them 4 inches by 3 inches, but now I just have an excuse to sew more!

"I paint a faithful beauty, I form a perfect assembly..."


I spent a little time deciding what I wanted my design to look like, and then I drew it on the silk. I spent a few hours embroidering it (I did this all at work, so I just tried to replicate stitches that I had seen, I don't know the names for anything that I used), and then waited for the black silk ribbon that I had ordered to arrive.

"My motto is to love you/It will never change"


Once the ribbon came, I stitched my garters into little tubes, and put the ribbons in the ends. I cut the ribbons long enough to tie in the front after wrapping around the back once, and voila! Garters!

My original sketch

A little bit taller than I would like, but not bad for a project that I did no real size comparisons/measuring for!

Your ribbons can be as long as you'd like, but I recommend making them long enough to wrap around your leg once, and then tie easily in front.


All of this happened back in August of 2016. However, I meant to try and find lots of pictures of extant garters and make this into a huge post, but the computer that I saved most of my research on will no longer turn on or work. So, I'm finally posting this now, with a potential promise of more historical edits to come later. Hopefully, I'll also be sewing more garters, and so I can update this post with those photos as well! (I did recently embroider a 'whigish' set for one of my friends - tan embroidery on blue tape saying "Liberty or Death" and "Don't Tread On Me" - I just need to get photos of them from him!)

I found these on Instagram, and loved the modern adaptation - she really captured the true spirit of some 18th century garters by using a much more modern joke!

I would also like to say that I visited Europe for spring break, and had the opportunity to see "Undressed: A Brief History of Underwear" at the Victoria and Albert Museum - it was incredible! That exhibit was the main reason I wanted to go to Europe in the first place, and it didn't disappoint. Photographs weren't permitted in the exhibit, but I got to see a few sets of garters that I had come across in my research displayed there, and that was very exciting for me.

"United forever/I die where I cling"

Here's a really good resource for images of garters from different collections, some with words and some without.

Wednesday, July 20, 2016

Stays! (a.k.a. Another Reason Why I Love My Job)

So, I get to sew at work, and I get to talk about history all day - I officially have the best job ever!

Because of this, I have been working on quite a few projects this summer, and I am very pleased with everything I've been turning out. The first thing I sewed, and what I most desperately needed, was a new set of stays. As you could probably tell from my last post, my old set has become far too worn, the boning has entirely shaped itself to my body, and after losing a bit of weight they're just too big. So, I was ready to make another set!

Working on my stays while talking to a young visitor (not pictured)
I decided to make strapless stays this time, so that I wouldn't have to worry about the neckline of my gowns, and since I loved my last JP Ryan pattern so much I decided to order another. I chose light blue linen and a white linen lining from my favorite linen source, and I ordered leather binding and linen cord from Burnley and Trowbridge. I considered using metal boning, but decided to work with big zip ties again, as I have repeatedly been told how much like baleen they are (also, they're very cheap to buy!) I think I might use metal boning in my next set though, or perhaps try it out when I finally make my regency stays...

My linen cord, leather binding, and the linen thread that I used (thanks to some generous friends for the thread!)
I lengthened the pattern slightly, and then cut out all of my pieces from the lining material. I don't have a particularly long torso, but I've found that most stays seem to be a little shorter on me than I would like, and they are both more flattering and comfortable if I extend them by an inch or two. I really just eyeballed how much longer they needed to be by holding up my slashed pieces to my body, and then once I sewed the lining I checked the fit.

The patterned slashed and lengthened
All ready to be cut out from the lining
I should note that I deviated from the pattern instructions a little by sewing the lining first. However, I wanted to test the fit before cutting out my blue linen, and I personally like have a lining that is slightly more independent from the other fabric. It doesn't affect the fit or the look of the stays, and I think it makes it easier to air them out.

Stays aren't really difficult to sew, there's just a lot of sewing involved. I sewed all of the pieces together, and then traced the lines for the boning channels onto the lining. That was probably the hardest part of the whole process for me, because by the end of that step it was getting a little difficult to see all of my lines as I was sewing.

Pieces sewn together...
...and ironed...
...with the channels marked...

...ready to be sewn...
...and ready to be filled!
After that, I cut and inserted the boning, and basted across the bottom to close it up. Always, always, always cut your boning a little bit shorter than you think you need to! It doesn't need to be straining against the binding! (I have a bad habit of doing this, and then having to reopen the binding to trim down the bones that are poking through/poking me.)

The zip ties that I use
The left side has boning inserted, the right side still needs boning

Fully boned, with a few poking out to show trimmed ends
Finally, I made the eyelets and bound the bottom in kid leather. I think I will eventually bind the top and sides in leather too, but I was so excited to wear them that I stopped after just doing the bottom.

I couldn't be more pleased with how they turned out! It took about 55 hours of work from start to finish, and every stitch is hand sewn. I really enjoyed having them as a tool to encourage discussion about stays with visitors, and to be able to inform people that stays, and corsets too, shouldn't be uncomfortable if you're wearing them properly! My new favorite part of my interpretation goes something like this: "If you have a pair of shoes that hurt your feet, how often do you wear them? If you don't wear uncomfortable shoes repeatedly, do you think that anyone would have worn stays or corsets for a few hundred years if they were uncomfortable?" This also works when people ask me if I'm hot in my clothing - yes, I'm a bit warm, but they are too, because the heat index is 109! But there's logic in wearing linens and cottons, and in keeping the sun off!


Anyway, I would highly recommend the JP Ryan Strapless Stays pattern, and I am extremely pleased with my new set of late 18th century stays!