Showing posts with label Hats. Show all posts

Saturday, August 19, 2017

Day 19: Ornament

This is the first post for this month that I really struggled with. I don't do a lot of ornamentation because so many of the things I make and wear aren't displaying that sort of wealth or that type of life style. However, I realized that there is one way I like to ornament my ensembles, and that's with a hat that makes a statement. Usually, that means a market bonnet!

I know that I've posted about market bonnets before, but I wanted to highlight the many different ways that they can be ornamented.


Plain black silk goes with pretty much every wardrobe - even in the 21st century!

While black was certainly the most common color, every now and then it's nice to be a little bit flashier - I trimmed this red silk market bonnet with scalloped while silk and a bow with pinked edges!


Here's another market bonnet that I made, this time a standard black bonnet with a pretty teal bow and scalloped trim!

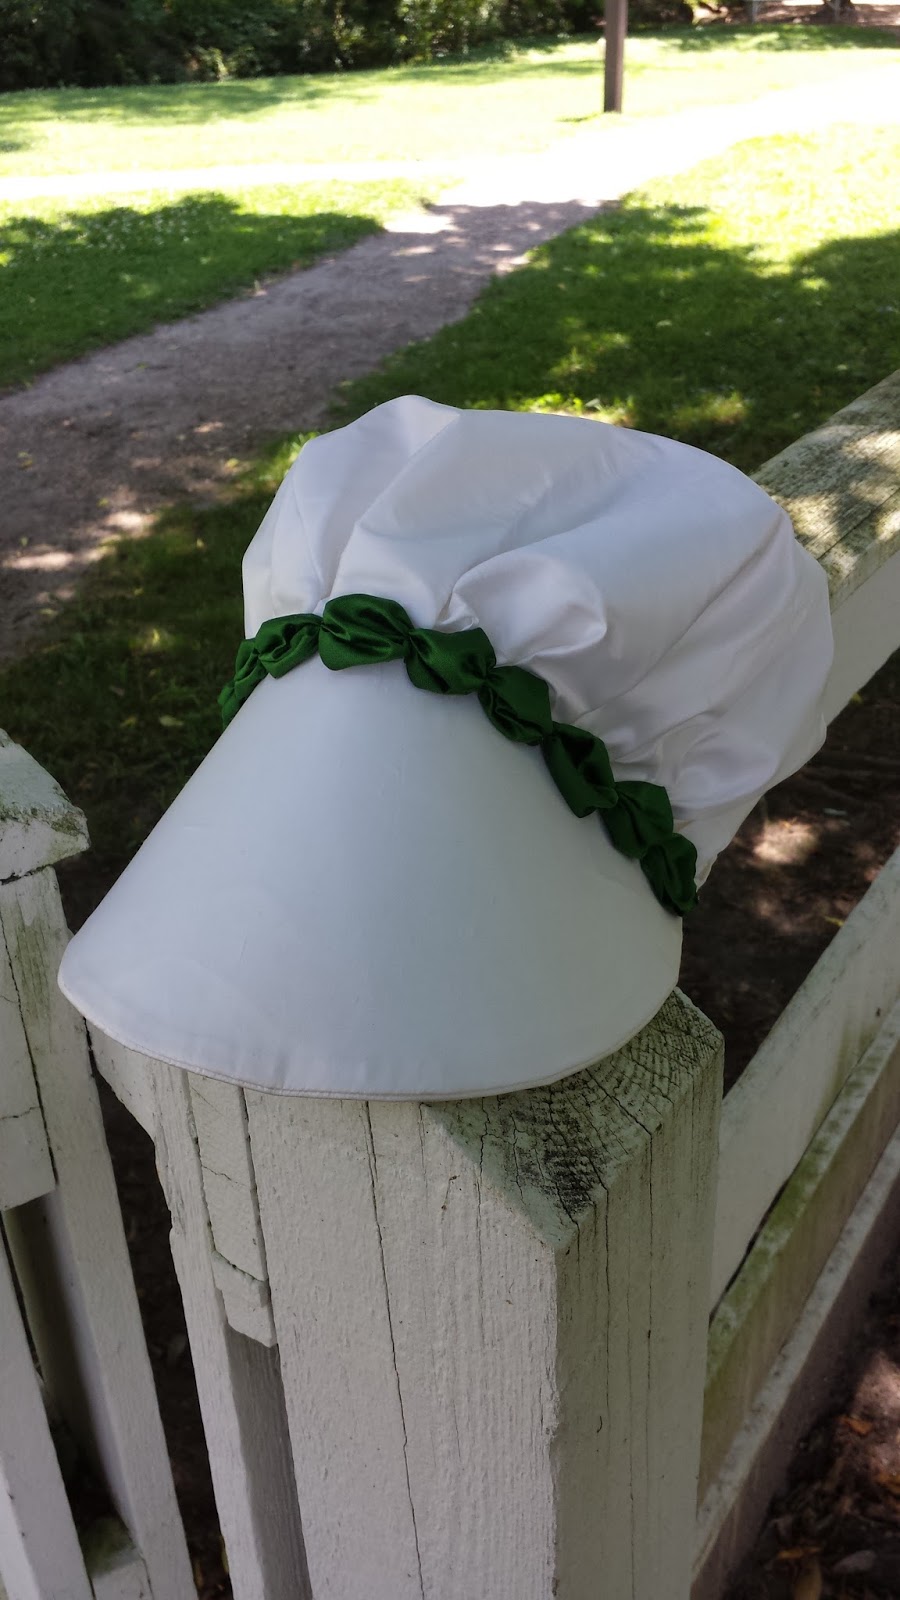
And one of my more recent projects, a white market bonnet that I added scalloped green silk to this summer for a friend!

Market bonnets are a great statement piece for any wardrobe, and there are endless ways to ornament them! They're one of my favorite things to sew, and if you want one for yourself, send me an email and let me know (stacylynnsews@gmail.com).

Sunday, August 13, 2017

Day 9: BIG Project

            So, every now and then you see something, whether it’s in a store, on the screen, or in a book, and your first thought is, “Well, that’s just ridiculous”, followed up immediately by, “I must have it.” That was the story of me with the calash. I saw it in the Milliner’s Shop in CW when I was young, and after the half second required to make a face at how ridiculous it was, I decided I needed to sew one someday.

Some period depictions of different calashes


            Last summer, I sincerely thought about starting one, but I didn’t have any fabric suitable for it. I wanted to make one that was green silk, with a pink or red lining, since I had plenty of documentation for 18th century calash bonnets fitting that description. (There are so many shapes, sizes, and colors of calash bonnets though, check out the MET's collection!) I found a bargain on green silk and ordered it last August, and then in March of this year I found some pink linen that I loved at the Fort Frederick Market Fair. One of my friends had some reed she was giving away, and with that, my calash was born.
            I started by analyzing the calash from Fitting and Proper, and replicating the measurements at their full scale. From there it was simple straight sewing to make the rectangle with all of its boning channels and gathers, and then add some ruffled edges and insert the boning.

My half-gathered silk in one of my favorite break rooms/sewing spots at work
            The biggest challenge was probably trying to keep my stitches invisible – no matter what color thread I used, it would show through on one of my layers. I experimented with different stitches, keeping them discreet, and eventually found something I was happy with. If I was to do this project again, I might consider using tapes to make the channels on the linen lining, and then pick-stitching the green silk over top. However, this method was certain cheaper and faster! I am also contemplating making another with just the green silk, and folding the silk around the reed to sew the channels that way. It would be lighter, and would also solve the problem of visible stitches.

Sewing gathers after boning channels
            One of the things that really excited me about this project was how much I would get to learn. In addition to the basic research one does when they undertake a historical sewing project, I also realized that I would be learning more about how an 18th century lady carried herself. As I sewed, I interpreted the project, and found guests asking the same questions I had been asking myself: Would it really balance on my shoulders with just the small ruffle and tie? Would it actually stay up like I wanted it to? What if my arm got tired from holding the ribbon? (I especially love questions like that last one, asked by a very young girl. The smallest visitors usually have the most insightful questions regarding the practicalities of everyday life that would otherwise be overlooked.)

At this point, most visitors who saw me working remarked that it looked like an accordion or a caterpillar! You can also see some of the reed I used in the lower right corner.

All of the cane cut to length and inserted into the channels - it was quite the monstrosity at this point! (And I can't wait to make an even bigger one!)
            However, once I finished the calash, I had answers! I still haven’t added the ribbon, but if your arm does get tired, it’s okay – the calash stays up on its own! I don’t know if I could run in it, or if it would stay put in gale force winds, but I am certainly able to walk around and go about my business at work with it on.


            So, for a project I spent a month affectionately referring to as my ‘starburst watermelon hat’, I’m pretty pleased with my fancy outcome!


*This post should have been published on Wednesday, August 9th. However, I was on vacation and was not able to photograph everything before leaving

Sunday, August 6, 2017

Day 6: Book Recommendation

            I have a lot of costuming books, and especially historical costuming books. So, choosing a favorite is pretty difficult. However, Fitting and Properstands out to me, being one of my first costuming books, as well as the first book I drafted a pattern from.


            My parents got it for me as a reward for finishing an extra online class ahead of schedule, as well as buying me my first pair of 18th century shoes. I’ve sewn a gown, mitts, shortgown, and a calash so far from the patterns in the book, and it couldn’t have been easier to follow!
            In a similar vein to The Cut of Women’s Clothes, the book places traced patterns on a grid, so they’re easy to reproduce exactly as they exist in real life, but they can also be sized up or down to fit each individual. The book also provides the thread count for the materials, instructions for the construction, photos of the original garments, and a written history of both the generic idea of the type of garment as well as the extant piece itself.


            I highly recommend this book, especially for those costumers who are just entering the historical costuming world, or anyone who is learning how to draft patterns. And, even if you don’t make anything from it, it’s still a wonderful book to flip through and learn from!

Wednesday, August 2, 2017

Day 2: Current Project

            I’m seldom in between projects, as I like to keep my hands busy at work! Right now I am whipping up a cap, in order to perfect a look I’ll feature next week. Caps are one of my weaknesses, both in terms of what accessory I always want more of, as well as one of the things I am the worst at constructing. It’s a well-known joke in my circle of reenactor friends that if I’ve worn a cap I’ve sewn twice, it will never be seen again. I usually decide that I hate whatever cap I just made at the end of the first wearing, and after a second day with it, the cap disappears into the box of old reenacting clothing.
            It’s not that there’s anything wrong with my methods – a lot of my caps are replicas of 18th century ones – but I just don’t like how my head looks in most caps. The ruffles have to be just right, and the body of the cap has to sit at just the right angle with just the right amount of pleating and gathering, and that seldom happens. So, my biggest challenge this time is making something that I actually want to wear!


            I started by looking at lots of caps, looking at primary sources (paintings, extant garments, and patterns/books), as well as modern reproductions and tutorials. When I thought I knew what I wanted, I cut out trial caps out of some scrap linen/cotton blend. There's nothing terribly exact about my methods here, I just measured my head and made some educated guesses, but here's what worked for me:
  • The distance from the base of my skull (where the cap will be at its lowest point) to the top of my forehead minus two inches (ish) for the band was 12 inches. This measurement was done over top of my bun, as that's how I will be wearing my hair in this cap.
  • The distance from earlobe to earlobe, as measured across the base of my skull, was 10 inches. I added 6 extra inches, to accommodate pleating.
  • The distance from earlobe to earlobe, as measured over the top of my head, where a headband would sit, was 16 inches.
Then:
  • Cut one half-oval with a base of 16 inches and a height of 12 inches. This works best if you cut on the fold, so it's a base of 8 and a height of 12, and you automatically end up with a symmetrical curve.
  • Cut one strip approximately 2.5 inches wide by 16 inches long.
  • Finish the flat edge of the oval, one long edge on the band, and both short edges on the band (a whipstitch, backstitch, or even a nice running stitch will do).
  • Add 6 pleats to flat edge of oval, finished measurement should be 10 inches long.
  • Pleat curve of oval to fit unfinished edge of band, attach band to curve.
That's a pretty basic cap. I whipped that up start to finish during work on Monday, and after work I went to buy some lace.


Right now, I’m working on adding the silk and the lace over top of the body, and finally I’ll be adding the light blue ribbon that’s seen in the painting. Essentially, the lace gets pleated over the band, with a little bit hanging over the edges (I'm using 100% cotton lace from JoAnn Fabrics because I'm not an expert on 18th century lace and I didn't want to spend too much money on this project). The silk (from Burnley and Trowbridge) is cut to the same dimensions as the body of the cap, with an extra 1/2 inch seam allowance to help everything lie nicely. Check back on Day 10 to see how it all turns out!


Tuesday, May 3, 2016

They're All the Rage... A Market Bonnet!

Just as there are trends in modern fashions, there are fashion trends in the reenactment community. In the past few years, market bonnets (also sometimes called 'working caps/bonnets/hats') have come back into style! Colonial Williamsburg has one in their collection, which I based mine off of, and they have begun adding these bonnets to the wardrobes of some of their employees. Well, that was enough convincing for me - I just had to have one!

This is the market bonnet in the CW Collections - Check it out!


I bought some black silk, and made up a pattern. I bought a yard of silk, as recommended, but I cut very carefully and only ended up using half a yard - so I can make another hat and sell it! (If anyone is interested in a market bonnet, please comment or send me an email.)

The pattern pieces all laid out

This was a pretty easy project, the hardest part was getting the brim to fit exactly right in the silk, but even that was not terribly difficult. Overall, this only took about four hours from start to finish. The most challenging part of the whole process was getting a good picture of the finished product!

Some silliness before I gathered the pouf

The first finished picture

It's entirely handsewn, and the brim is a posterboard-type material that according to my research seemed to be pretty close to a traditional brim. I would have liked to use a completely authentic material, but this bonnet was a last-minute project for my birthday outfit while I waited for my linen for my new shift to ship, so I didn't have time to order anything.

This is now one of my favorite accessories, and it's a great talking point at events! Even though there's tons of documentation on market bonnets in the late 18th Century, not many people are familiar with them, so I've been getting lots of questions.

This picture was taken as I was adjusting my birthday dress, but it shows off the hat quite well!

One of my favorite pictures from my birthday, taken by my friend Kirsten in the Tucker House in Colonial Williamsburg, showing off my gown and market bonnet.

I would highly recommend sewing a market bonnet if you reenact a late 18th Century female. This project was super easy, very satisfying, and inexpensive - even though it's made out of silk, it's a very small amount. They were worn by a wide variety of women, including the working class, and are a great accessory to almost any outfit! If you're interested in more of the history of this hat, try searching for things like "colonial silk bonnet", or just start looking at paintings/drawings of women at work in the 1770s. You can also feel free to comment with any of your questions, and I'll be happy to answer them.

Happy sewing!